

1.Code Maintenance
Code File Maintenance allows the user to create and control the drop down lists in PACS. The majority of the drop down lists in PACS are specific codes that are associated with an office procedure.
Procedure:
- Browse to PACS Application Button, click Tools>Code File.
- The Code List dialog box renders

- Code Maintenance is sectioned by genre. The Count beside each genre will indicate how many codes are associated in the genre section.
- User may drop down each genre to see specific codes associated

- User will double click on code to open. In this example, we will use the Appraiser Codes.

- The majority of codes will have these items in common:
- Code – this is the code that user creates
- Description – description of code
- Inactive Flag – if code is no longer valid, user may check inactive flag so it will not show up in drop down lists.
- Change Log – User may see changes made to the Code Maintenance.
NOTE: A large portion of your Code Maintenance will be populated during the Conversion process before user goes live with PACS. However, user may continue to create, delete and modify codes after go live as business process changes.
1.1.Event Status Code
Purpose:
This code file defines various statuses of an event or letter that may be entered on a property record. For example, ‘PV (Pending Verification)’ could be used to indicate a mandatory taxpayer response is needed for an exemption verification letter that was sent.
Procedure:
To create Event Status Code(s), navigate to Tools > Code Maintenance > General > Event Status Code.
- Users can either add a new code (+), remove a code (x), or Edit an existing code.
- Code names and descriptions are to be determined by the individual office.

Using Event Status Codes
1. An Event Status and Recheck Date can both be manually added to an event detail at the property Events panel.

NOTE: There is no column chooser to see the Event Status or Recheck date in the Events section of the property screen.
2. Users can associate an event status to a letter via Letter Processing Maintenance in Microsoft Word. By selecting the ‘Enable Event’ checkbox, users can default an Event and Status whenever the letter is printed.

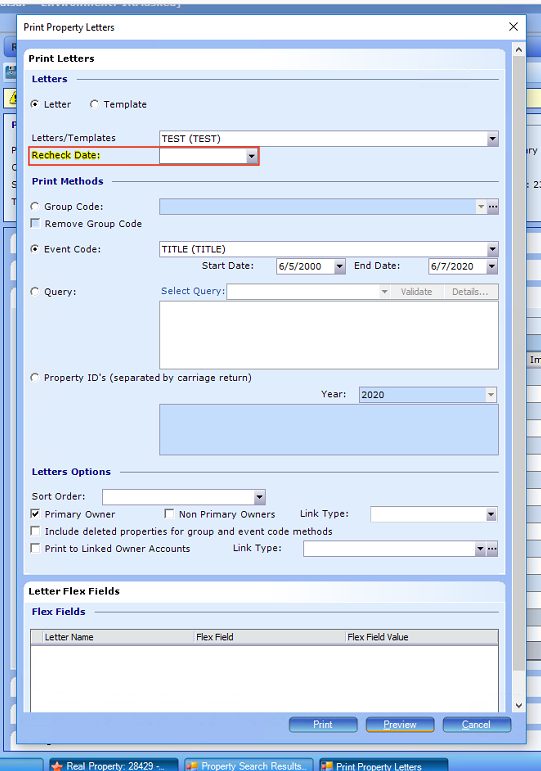
3. When generating a letter through Activities > Letter Processing or through the Commands menu at the property level, under the Letters section of the Print Letters dialog screen, the user can enter a Recheck Date if needed. Upon printing the letter, this Event information will be captured and visible at the event details located on the property Events panel.
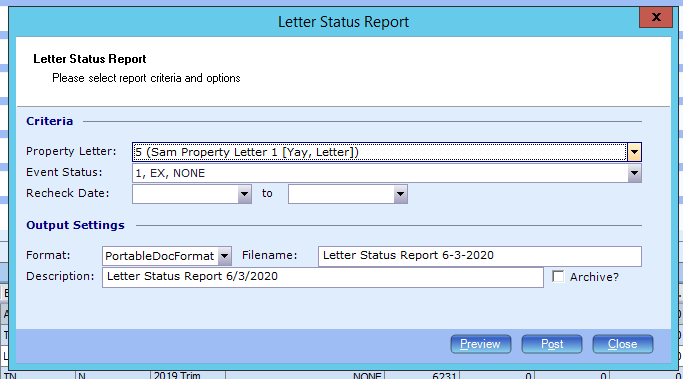
4. The Letter Status Report is used to review a listing of properties with the letter, status code, and recheck date range specified. The listing includes Parcel ID, Prop ID, Owner Name, Status Code, and Recheck Date.
-
-
- In PACS, navigate to Reports > Letter Status Report, and the Letter Status Report dialog box is displayed. Complete the selection criteria, then click Preview or Post.
-
NOTE: If Event Status codes are added manually to the event details, these will not be listed on this report. A query or Monitor will have to be run to access these event details.
2.Schedule Maintenance
Purpose:
Schedule Maintenance is where user creates and modifies valuation schedules in the PACS.
There are nine type of schedules:
- Citrus
- Condo
- Depreciation
- Improvement
- Land
- Matrix
- Income
- Personal Property
- Slope Intercept
NOTE: Client schedules are brought in during the conversion cycle before the client conducts go-live in the system. However, as business and market changes, clients will still use this maintenance format to update and create new schedules.
Procedure:
- Browse to PACS Application Button, choose Tools>Schedule Maintenance
- Please refer to the Schedule Maintenance (improvement/land), Matrix Maintenance, Personal Property, Condo, and Citrus to get more detail regarding how to set up a schedule.
3.System Configuration
Purpose:
PACS has system configurations in order to customize a users experience in PACS. This allows customers to control certain aspects of what data is shown/hidden, determine how particular items are calculated, etc.
Procedure:
- Browse to PACS Application button, choose Tools> System Configuration
- There are five System Configuration Categories that
- System
- Imagery
- Letters/Mailer
- Import/Exports
- Notice/Cards
- Reports
System
- Address Validation Service
- Enable Address Validation Service – If you use the address validation service within PACS to verify addresses, select True, if not, select F.
- Annexation
- Associate Non-Qualifying Properties – If you associate non qualifying properties, select True, if not, Select False.
- Appeals
- Appeals System Override – allows user to override the system for appeals
- Default Appeal Case Create Year – set default year
- Default Appeal Case Search Year – set default year
- Default Inquiry Create Year – set default year
- Default Inquiry Search Year – set default year
- Enable Value Distribution – in the appeals, if this is True, it will allow Distribution to work for Appeals.
- Applications
- Default Application Status – user chooses what status they would like to default. Example: In progress
- Default Exemption Category – user chooses what category they would like to default. Example: if user receives more Homestead Application as the most common application, then it can be set for HS.
- Default Image Record Type – default which image record type is most common in applications
- Default Image Sub Type – default which image sub type is most common in applications
- Default Image Type – default which image type is most common in applications
- Auto Over 65 Option
- Skip Properties with ‘Reset Exemptions’ checked during Batch Processing – choose true/false
- Citrus
- Use Negative Values – T/F
- COLD Location
- Cold location – set network path for plat maps
- Condo
- Distribution Method – choose how user wants ti distribute Condo value (Improvement, Land & Improvements, Total Value)
- Confidential Name Options
- Confidential File as Name – user choose file as name for confidential owner (example: Confidential, Justin Thyme, etc)
- Confidential First Name – user choose first name for confidential owner
- Confidential Last Name – user choose last name for confidential owner
- Custom Report Options
- Default setting for using the SQL DSS for custom reports – if user uses Report Writer module, this will need to be coded as True
- Distribute Values
- Require Distribute Value Reason – allows user to require user to input reason for distributing value (T/F)
- Duplicate ID Warnings
- User can choose to have PACS alert user if duplicate exists in GeoID, Ref ID 1, and Ref ID 2.
- Exemption
- Automatically add HEX-A when HEX is present – T/F option
- GIS
- Disclaimer – this is an open text that allows user to input standard disclaimer for GIS Maps produced out of PACS
- Max Properties – allows max properties allowed to be displayed on map. Default is 1000
- HS Wizard Default Settings
- All Improvements and Land to Homesite – T/F – setting this to True indicates that newly created improvements/land are automatically set to Homesite
- Roll Correction Code – User can set standard Roll Correction Code for HS Wizard that requires roll correction
- Roll Correction Reason – User can set standard Roll Correction reason for HS Wizard that requires roll correction
- Improvement
- Default Effective Year to Actual Year Built – T/F
- Default New Value Flag for New Improvements Detail to be Checked – T/F
- Default New Value falg for New Improvements to be checked – T/F
- Effective Year Required – T/F
- Income Valuation Options
- Apply Land & Imprv Designation Distribution to All Methods – T/F – allows distribution for all income methods
- Summary Value Information – Calculate Improvement Level Value Per Unit – Scheduled Units or Designated Units
- Summary Value Information – Calculate Value Per Area – Net Rentable Area or Gross Rentable Area
- Use Levy Rate in Cap Rate – T/F
- Use Reimb Expenses & Secondary Income to Calculate EGI – T/F
- Use Reimb Expenses & Secondary Income to Calculate GPI – T/F
- Land
- Allow entering land details on Improvements on Leased Land properties – T/F
- Default New Value flag for New Land Segments to Checked – T/F
- Liens
- Assessment Limitation Percentage Penalty – User may enter 0 to 100%
- Exemption Penalty Percentage – User may enter 0 to 100%
- Mass Create
- Require Parent Parcel – T/F
- Master Lease
- Include Assets Default – T/F
- Mineral Non Producing
- Apply reduction to both Land Market and Productivity Value – T/F
- NBHD Analysis Default Target Ratio
- Default Target Ratio – 0 to 100%; Default is 100%; this means what % of market value is user trying to achieve.
- New Year Layer
- Set State Assessed Values to Zero – T/F
- Oil Well Adjustment Acres
- User will set standard acres of ‘damaged’ land per oil well. Example: 1 oil well = 1 acre of land
- Ownership Transfer Options – these are configurations for the Ownership transfer wizard..
- 100% Rest Cap by Default – T/F
- Inactive Agent Checkbox – T/F
- Reset Exemptions by Default – T/F
- PACS Data Entry Options – this is the data entry templates
- Disable Addition of New Improvements – T/F
- Personal Property Defaults
- Require NAICS Code – T/F
- Segment Appraisal Method Default – Adjusted Value/Flat Value/Original Cost/Rendered/Special Pricing/Sub Segments
- Segment Type Default – Segment/Subsegment
- Show Business Personal Property Review – T/F
- Show Percent Good Field – T/F
- Sub Segment Appraisal Method Default – Calculated or Flat Value
- Use System Address – T/F
- Portability Application
- This will pull in Record, Sub Type, Image Type from Code Maintenance if user wants to set up default code for portability application
- Property
- Copy expired codes to new year layer – T/F
- Property Fixed Panel
- Enable the display of the Geo Id – T/F
- Reappraisal Year Default Settings
- Default year settings for 6 years
- Recalculation Error Validation
- T (True) or F (False)
- Roll Correction
- Ignore October 31 rule – this is Washington Specific
- No Change of Value Event – T/F
- Roll Correction Reason Required – T/F
- Show Special Assessment Warning – T/F
- Sales
- Confirmation Source – Open text to describe most common confirmation source (Example: MLS)
- County Ratio – user can enter 0 to 100%
- Documentary Stamp Tax Rate – enter dollar amount (Example .70)
- Finance, Ratio, and Sale Type – these are set up in Code Maintenance. Set Default here as needed
- Split/Merge
- Copy Deed History – T/F
- Ignore Balancing – T/F
- Property Identification Method – Property id/Geo id
- Retain Parent Property – T/F
- Use Slope Tool for Split/Merge Wizard – T/F
- Street Default
- T/F If Street Default is turned on, this means that users will not be able to enter free text in street field. It will configure a drop down box
- System Address
- This is the address of the Assessor Office. This is information printed on TRIM Notices and other forms of communication. It is important when Assessors change due to elections, this is changed.
- System Display Options
- Apply Mass Adjustment Factor to Adjusted Value Improvement Segments – T/F
- Apply Mass Adjustment Factor to Adjusted Valued Land Segments – T/F
- Apply Mass Adjustment Factor to Flat Valued Improvements – T/F
- Apply Mass Adjustment Factor to Flat Valued Land Segments – T/F
- Capping History Number of Years to Display – default is 10
- Default Reference ID – Geo ID, Ref id1, Ref id 2
- Display Geo ID instead of Property id in Property Title Bar – T/F
- Display Labels on GIS Viewer – T/F
- Display Special Assessment Roll Correction Warning – T/F
- Display Warning if Active Agent on the Property – T/F
- Edit Fee Number of Iterations – default 1000
- Show SA Exemptions – T/F
- Tax Return
- Include Asset Listing – T/F
- Include Barcode – T/F
- Taxing Authority
- Uncertified Year Tax Rate – Prior Year Rate, Proposed Rate, Rollback Rate, Certified Rate
- Timber 78 Option – this is Texas Specific
- Timeshare
- Distribution Method – Improvements, Land & Improvements, Total Value
- Max Maintenance Weeks Allowed – user enter # of weeks
- View Configuration
- Enable Max Extents – T/F
- View Closing Validation – None, WarnOnce, WarnAlways
Imagery
- Face Map Location
- Plat Map Field – Map Id, Reference Id 1, Reference id 2, Subdivision Code
- Pictometry
- Coordinate System – North Washington, South Washington, Central Texas
- Enabled – T/F – this is a add on module for PACS. Please contact Sales, if you would like to enable
- Margin – Horizontal Percent – user enter percent; default 10
- Margin – Vertical Percent – user enter percent; default 10
- Master Workspace Filename – open text
- Workspace Path – network path
- Sketchpad Settings
- Auto Pointer Location – T/F
- Center Label – T/F
- Default Font – user chooses font from selection
- Separator type – X or /
- Show Area – T/F
Letters/Mailer
- Default Label Printer – input network path of label printer
Imports/Exports
- Export File Location – enter network path
- Import File Location – enter network path
Notice/Cards
- Appraisal/Field Review Card – Appraisal Card Default – user will choose defaults. The majority of these are T/F questions
- Appraisal/Field Review Card – Field Review Card Default – user will choose defaults. The majority of these are T/F questions
- Appraisal/Field Review Card – Field Review Land Card Default – user will choose defaults. The majority of these are T/F questions
- Default Appraisal Notice Settings (TRIM)
- Always display frozen value on Notice – T/F
- TRIM Notice
- Enter address for TRIM Notice
Reports
- Appraisal Card Report Option
- Display SSN in Report – user chooses to use Real Value or Astericks
- Certified Rolls Report Geo
- Show Ref ID 2 in place of Geo – T/F
4.System Rounding Factor Maintenance
Purpose
User will use the System Rounding Factor Maintenance to determine how values will round in the for Cost/Market approach, Income, and Citrus properties.
Procedure
- Browse to PACS Application button, choose Tools>System Rounding Factor Maintenance

- The rounding factor is held by year. User will choose the year they would like to edit, click Edit button
- Cost & Market Approach – click radial button to choose to round to the nearest 1, 10, 100, 1000 dollar.
- Income Approach – click radial button to choose to round to the nearest 1, 10, 100, 1000 dollar.
- Citrus Schedule – click radial button to choose to round to the nearest 1, 10, 100 dollar.
NOTE: We highly recommend user DOES NOT change rounding to a certified year.
5.Appeals Maintenance
Purpose
User will use Appeals Maintenance to set up codes, letters, mapping, appraiser meetings and dockets for VAB.
Procedure
- Browse to PACS Application button, choose Tools>Appeals Maintenance
- Inquiry Codes – set up Inquiry Status Codes to track the Inquiry through office process.
- Letters – set up letter templates for use in Appeals. NOTE: Letters must be set up in Letter Processing in order to select.
- Map Source – map Inquiry and Protest sources
- Printer Settings – Set up letter and printer source
- Reason Code Mapping – Map Protest Reasons to appropriate codes.
- System Settings – Appeal & Inquiry set up, Evidence Packet, and Inquiry Settings
- Appraiser Meetings – if office chooses to use appraiser meetings vs dockets, set up schedules in this location
- Appeals Hearing Dockets – set up dockets for Agent, Appraiser, and Property
NOTE: For full information regarding Appeals, please see the Protest Processing guide.
6.Auto Build Legal Configuration
Purpose
User may set up the configuration to build legal descriptions automatically.
Procedure
- Browse to PACS Application button, choose Tools>Auto Build Legal Configuration

- Setup
- Select Type – choose Abstract, Condo, Mineral Property, Mobile Home, Subdivision, Township. If user chooses to use the auto build legal option, we highly recommend creating a template for all types.
- In the grid section, user will build the legal description
- Include – Check to include in legal description
- Prefix – include text to add prefix or wording. Example: Prefix = BLOCK
- Description – description of code
- Suffix – include text to add suffix or wording.
- Delimiter – None, 1 space, 2 space, 3 space, comma, semicolon
- Move up – highlight legal description item, click move up to move the item
- Move down – highlight legal description item, click move down to move the item
- The blue box under the grid will show example of how legal description will appear on property.
- Click OK.
7.Building Permit Worksheet Configuration
Purpose
PACS allows user to complete a building worksheet so that user may track the progress of a building construction.
Procedure
- Browse to PACS Application>Tools>Building Permit Worksheet

- Click Green Plus to Add a Worksheet Template

- Worksheet Type – choose worksheet type (Permit or Tidemark)
- Component name – name component description (plumbing, slab, exterior walls, etc)
- % of Total – add percent good this would add to a building (Roof = 10%)
- Click OK to save
NOTE: We recommend the sum of all % equals to 100%
8.Change Log
Purpose
The change log in PACS allows the user to review changes made on a property, owner, etc. This procedure will show user the administration to track fields in the change log.
Procedure
- Browse to PACS Application button, choose Tools > Change Log and Tools>Change Log Transaction Selection

- Available fields to log – these are transactions available to log in PACS
- Selected fields to log – these are transactions currently logging in PACS
- To move a selection to or from the fields, user will use the arrows
- Single arrow – will move one highlighted or group of highlighted selections
- Double arrow – will move all fields
- Click OK
9.Comparable Property
Purpose
User will set up configuration and maintain templates for Comparable Grids in this area.
Procedure
- Browse to PACS Application button, choose Tools>Comparable Property
NOTE: For detailed information, please review the Comparable Sales User Guide for full instruction on setting up comparable grids.
10.Document Imaging Maintenance
Purpose
User will set up codes and forms maintenance in relation to images
Procedure
- Browse to PACS Application button, choose Tools>Document Imaging Maintenance
NOTE: Please see Image and Document Management User Guide for full instructions on how to use this module.
11.Improvement Detail Feature Template
Purpose
User will set up improvement detail feature templates in order to reduce data entry time.
Example: User may set up an Improvement Detail Feature of a Basement to have features defined. When a user creates a new property with the Improvement Detail Type Code of Basement, the features will automatically populate.
Procedure
- Browse to PACS Application button, choose Tools>Improvement Detail Feature Template

- Click green plus to add Template

- General
- Detail Type Code – User will select Improvement Detail Type Code (Example: Basement)
- Detail Method Code – User will select Method Code (Example: Residential)
- Features
- Click Green Plus to add features
- Feature Type – choose feature type (Example: Bathrooms)
- Feature – will populate automatically
- Units – will populate. User may edit the units here as well.
- Continue to add features until complete
- Click Green Plus to add features
- Click OK
12.Inventory Stratification Reports
Purpose
The Inventory Stratification Report item allows the user to set up ranges in order to run the Neighborhood Inventory Reports located in Reports>Neighborhood>Neighborhood Inventory Reports.
Procedure
- Browse to PACS Application Button, Choose Tools>Inventory Stratification Report

- Neighborhood Acreage Range
- Click Green Plus
- Enter minimum and maximum ranges
- Neighborhood Land Square Foot Range
- Click Green Plus
- Enter minimum and maximum ranges
- Inventory Year Range
- Click Green Plus
- Enter minimum and maximum ranges
- Inventory Improvement Square Foot Range
- Click Green Plus
- Enter minimum and maximum
13.Letter Template Maintenance
Purpose
Allows user to create templates to create a collection of letters in PACS.
Example: A user may want to print a group of letters or forms for Appeals or Damage Assessments.
Procedure
- Browse to PACS Application Button>Tools>Letter Template Maintenance
- To create letter template, click green Plus Button

- The following Letter Template Detail dialog box is rendered:

- Template Name: Name the letter (example: AG DENIAL)
- Template Type: Letter or Form
- Letter Type: Choose where the letter is accessed from. The most common type of letter type is Property.
- Click Green Arrow; this allows user to choose what letters they want to include in the template
- Letter: Choose Letter created
- Printer: Choose default Printer location
- Copies: Choose standard # of copies to be printed
14.Machine Options
Purpose
Machine options allows individual computers to have Appeal and Configuration options set specifically for the computer.
Procedure
- Browse to PACS Application Button, choose Tools>Machine Settings > Options

- Appeal Options
- Auto Schedule when appeal is created – if checked, an appeal will automatically create if dockets are available.
- Generate Comp Grid when appeal is created – if checked a comp grid will generate for the property. User must have Comp Grid options set up prior.
- Always assign agent properties to an agent docket – if checked, an agent appeal will assign to an agent docket if available.
- When saving, automatically close an appeal with a close status – appeal will close if status is set as closed status in Code Maintenance.
- Auto start and end recordings for Hearing – if Audio is configured, when hearing starts, the audio will begin and start as appeal is opened.
- Appeal type – user will select code from drop down menu. Codes are set up in Code Maintenance.
- Appeal by Type -user will select code from drop down menu. Codes are set up in Code Maintenance
- Appeal Status – user will select code from drop down menu. Codes are set up in Code Maintenance
- Reopen Status – user will select code from drop down menu. Codes are set up in Code Maintenance
- Number of days until auto scheduled docket – user will select appropriate # of days.
- Appeal Default Year Options
- Always Ignore Machine Settings – if checked, this will ignore machine setting and review global configuration
- Default Creation Year – enter appropriate year; remember to update before each appeal season
- Default Search Year – enter appropriate year; remember to update before each appeal season
- Warnings – if checked, warnings will appear to user.
- Show warning when an appeal is being closed and there are more opened appeals for the same property
- On opening of appeals and there are more opened appeals for the same property, show warning
- Show warning when an appeal is saved
15.Minimum Tax Configuration
Purpose:
Set minimum tax per Florida Statute 197.212 for minimum tax bill
Procedure:
- Browse to Tools>Minimum Tax Configuration
- Enter the minimum tax for the year
Note: If you are newly implemented, then support may have to insert your initial records in table: minimum_tax_configuration. Input Support ticket.
16.Module Administration
Purpose
Some modules in PACS require that an individual machine be assigned to a license. This will allow user to assign machines to specific modules.
Procedure
- Browse to PACS Application button, choose Tools > Module Administration

Choose Module from the drop down menu.
- User will click Green Plus
- Add Machine (to find machine name, user may click Windows Icon, type ‘This PC’ in search bar, then click properties)
- Click OK
17.Monitors
Purpose
Monitors are queries that can be run behind the scenes in scheduled timeframes. Because the querying is consistent, users can create worklists for various procedures. In fact, many clients use them as workflows for their users.
Procedure
- Browse to PACS Application button, choose Tools > Monitors

- Monitor Name – input name of monitor
- Query or Stored Procedure – input query or stored procedure
NOTE: Please review stored procedure or query with support before proceeding. In some cases, the monitors have to be written in a certain format.
- Verify Query – when query is input in text box, click verify in order to confirm it is successful within PACS
- Monitor Type – use may choose from drop down box: None, Inquiry, Appeal, Tranfers
- Disable list sort – will disable sorting in query
- Refresh rate – user will input how often query should run in the background.
- Assign Users – Assign users who may access monitor.
- Click OK
For ideas or questions regarding monitors, please call Support. Additionally, examples of monitors exist in the Knowledge Base.
18.PACS Data Entry Template Maintenance
Purpose
The PACS Data Entry module allows users to customize dialogs for fast and easy data entry. Users first select data fields to include in a dialog template. That template is then accessed in PACS, allowing users to enter or modify data on Property records, Improvements, and Land details. PACS Data Entry cannot be used with Mobile Homes.
Use this procedure to create and maintain dialog box templates that allow for fast, easy data entry when working in PACS.
Procedure
- Browse to PACS Application button, choose Tools > PACS Data Entry Template Maintenance.
Note: The left/right arrows in the PACS Data Entry Templates toolstrip select the next or previous Template, depending on which arrow is clicked.
- In the PACS Data Entry Template Maintenance window, click Add to create a new dialog box template.
- In the PACS Data Entry Template Details Dialog box, your user name displays in the User field. To make this template your user ID’s default template when performing data entry in PACS, choose Default. You can have one default or no default template.
- To allow all users with the Mass Maintenance > Mass Maintenance PACS Data Entry user right to access this template, choose Global.
- Enter a Name for the template. Then enter a Description for the template. These fields are required.
- Choose the Default Group Code and Default Event Type that are recorded on property records when this template is used. None is the default option.
- To allow the user to create new Improvements on property during data entry using this template, choose Allow for New Improvement Creation.
Note: When using the template to create a new Improvement in PACS, the required fields are automatically displayed in the Data Entry dialog box. These required fields do not need to be included when setting up the template in PACS
- To display the Attributes grid associated with any Improvement Detail worked during data entry, choose Display Improvement Features Grid.
- To access Residential property codes when performing data entry using this template, choose Residential. For commercial codes, choose Commercial. (Some code files can be flagged as Residential or Commercial through Code File Maintenance.)
- To add a field to the template, click Add in the Field Information grid. Then do the following:
- a) For each line in the Field Information grid, choose a record type from the Type dropdown list. The selection in this field determines which options are available in the row’s remaining menu lists.
- b) Choose the Field from the drop-down list.
- c) To prevent the user from editing the selected type field on existing records (as opposed to entering new property/account records), deselect the Existing option.
- d) To prevent the user from modifying the selected type field on new records (as opposed to editing property/account records already in the database), deselect the New option. New can only be selected if the Allow for New Improvement Creation option is selected
- To set a default value for the selected type field when entering new records, choose the desired option from the Default Value drop-down list.
Note: Some fields, such as those used for setting up valuation schedules (i.e., Unit Price), may not be available/editable. Some fields are dependent fields whose availability depends on the presence of a primary field (i.e., Township Code must be selected prior to Range Code or Township Section)
- Continue adding fields to your template as required. To delete a field, highlight or select the field in the grid and click Remove .
- Click Apply to save your template and continue working. Click OK to save your template and close the PACS Data Entry Template Details Dialog box.
- In the PACS Data Entry Template Maintenance window, click Set Global Default to make the selected template the default dialog template for all PACS Data Entry users who do not already have their own default template set.
19.Personal Property Tax Return Maintenance
Purpose
To use the Tax Return module in PACS, user must set up configurations such as penalties, depreciation, etc. User will set up configurations in this area.
Procedure
- Browse to PACS Application button, choose Tools >Personal Property Return Maintenance
NOTE: Please refer to the Tax Return User Guide for full instructions on configurations.
20.Report Configuration
Purpose
User will input correct contact and content for their specific office. This information will print on specific reports.
Procedure
- Browse to PACS Application button, choose Tools>Report Configuration>Exemption/Portability Application & Denial Form Applications
- Property Appraisal Contact
- Print Name – Name of Assessor
- Mailing Address – Mailing Address of Assessor
- Website – Assessor Office URL
- Email – email address
- Phone – Assessor Office phone
- Fax – Assessor Office Fax
- Value Adjustment Board
- Website – VAB Website, if applicable
- EMail – email address
- Phone – Office Phone
- Fax – Office Fax
- Classification
- Description – Application Description
- Application Types – user will choose drop down to select value. Application Type must be set up in Code Maintenance
- Denial Reasons
- Denial Reason – hard coded in system
- Application Denial Type – User will select value from drop down. Denial Types must be set up in Code Maintenance.
- Click OK
21.Roll Acceptance Date
Purpose
The DOR has requested that the Florida Counties maintain the date their preliminary rolls are accepted by DOR. Data entered here will populate the 409 where the wording ‘Material mistake of fact’ area. This is generally done in July after the roll is submitted to the DOR.
Procedure
- Browse to PACS Application button, choose Tools>Set Roll Acceptance Dates

- User populates date from calendar function on a year basis.
- Click OK
22.Stratum Configuration
Purpose
The user will create stratums and map use codes to each stratum. Additionally, the user is updating a new year’s configuration because it is different from the prior year. This process will allow user to set up the stratum they wish. Then, when user wishes to run the Sales Ratio Report, the ability to ‘Include Stratum Statistics’ is available.
Procedure
- Browse to PACS Application button, choose Tools > Stratum Configuration

- The values are held by year. User will select year to configure stratum
- Click Green Plus to add new Stratum
- Enter Name
- Under property use, user will select property codes associated with the stratum
- Click OK
- User will continue to add stratums as desired.
23.Tax Escape Penalty Percentage Configuration
Purpose
Users will use this dialog to configure penalty percentages to calculate lien amount for Tax Escape.
Procedure
- Browse to PACS Application button, choose Tools>Tax Escape Penalty Percentage Configuration

- User select Year from drop down dialog
- Under Configuration, set percentage for the following:
- Assessment Limitation Penalty Percentage
- Exemption Penalty Percentage
- Click OK
24.User Settings
Purpose
User will set VAB User Default Inquiry and Protest options for Default Creation Years and Search Years.
Procedure

- Browse to PACS Application Button, choose Tools>User Settings>Set Appeal Default Years
- User will set Default Years for Creation Year and Search Year for Inquiry & Protest Options.
- Use Defaults – user may click ‘Use Defaults’ to populate with Global data
- Click OK
25.Work In Future Year Layer
Purpose
Use this procedure to allow users to work in future year layer. For example, you may need to work on future year splits, merges, new subdivision, ownership changes, etc. without affecting the current year values. You can only work in one future year past the current year.
Prerequisites
In order to perform this procedure, the following user right is required:
- Future Year Layer > Work in Future Year Layer
Procedure
- The Work in Future Year Layer option must be enabled in order to be used in PACS.
- Browse to PACS Application button > Tools > Work in Future Year Layer.
- User will receive message that the Future Year Layer in now ON.